Archive | Vegetarian RSS feed for this section

Green Beans with sesame Dressing

2 Jun

This is one of the most simple yet delicious cooked vegetable salads you can make. It is part of an immense repertoire of lightly cooked vegetables or ‘salads’ in Japanese cuisine and one of my favourite ways of eating green beans. This salad is best served at room temperature so it can be made in advance and keeps or travels well, so great for picnics or dinner with friends. Serve as a side to rice and grilled fish or with a number of small salads.

  • 250g  green beans
  • 1-2 tbsp tamari or light soy sauce
  • 1-2 tbsp sesame seeds

Toast the sesame seeds in a dry frying pan or skillet until golden brown, leave to cool then lightly crush, in a pestle and mortar, to release their flavour. Pinch off the growing end from the beans and pop into a pan of boiling water for a few minutes until the beans turn bright green and a little soft but still crisp then plunge into cold water to halt cooking and preserve their colour. Toss the beans with the soy and sesame and arrange in a serving dish. Serve at room temperature.

Cooks Note This dish can be made in advance and the salad will keep very well for a day so great for picnics or a packed lunch.

Runner Beans in Tomatoes

22 Aug

This little dish of runner or green beans gently stewed in oil and tomatoes has long been a favourite of mine. Its origins are probably Turkish or Greek. I remember eating several variations of it in Istanbul and in Greece many years ago. Like so many Mediterranean dishes it has few ingredients but the finished result is miraculously full of flavour. Serve as a side dish or part of a mezze spread or picnic.

Serves 2 Prep & Cook 30 minutes

  • 3 tbsp Olive oil
  • 150g Runner or Green beans, stalks removed
  • 1 small white onion, finely chopped
  • 2-3 fat cloves garlic, peeled and sliced
  • 1 tbsp tomato concentrate
  • 4-5 tomatoes, peeled and chopped
  • sea salt and cracked black pepper to taste

Heat the oil in a sauce pan, throw in the onion and garlic and fry for a couple of minutes then add the beans and tomato. Season and stir over a high heat to coat well. Reduce heat, cover and let the beans stew in the oily tomato sauce for 15-20 minutes, keeping an eye on it to make sure it doesn’t catch on the bottom, if it does add a little more oil or water. Serve as part of a mezze or as a side dish.

COOK’S TIP To freeze French beans; wash, top and tail and plunge into boiling salted water. I use a pasta pan with a removable drainer, which makes the job much easier. As soon as the beans turn a brighter darker shade of green (3-4 minutes) drain and plunge into ice-cold water to halt cooking and preserve the colour. When cool, drain well, bag up and freeze immediately.
Gardeners Note Great for gluts of beans and tomatoes in summer but it can also be made at any time of year with frozen beans and preserved tomatoes.

Green Bean and Coconut Fry

21 Aug

This is a delicious Indian style vegetable dish. Quickly fried with fragrant subtle spices and coconut to preserve the fresh taste of green beans. Great with dals and rice.

  • Green beans trimmed and cut into short lengths
  • 1 tsp Cumin
  • 1-2 dried red chilis
  • 1/2 tsp fenugreek seed
  • 1/2 tsp fennel seed
  • 3-4 tbsp grated fresh coconut
  • 1 fresh green chilli, thinly sliced
  • lemon juice to taste
  • salt

If you have one use a wok or a large wide pan. Heat a little vegetable oil and when hot throw in the dried chilli and cumin stir around until the chilli starts to darken then add the fennel and fenugreek. Don’t let the fenugreek brown or it will become bitter so quickly add the prepared beans. Stir fry until the beans turn bright green then add the coconut and green chilli cook for a minute or 2 longer but make sure not to over cook the beans. The dish will taste superb if you use fresh coconut but the dried desiccated stuff will give a good result particularly if soaked in a little water first and will need a little longer cooking. Season and sprinkle with lemon juice and serve immediately.

Variations You can substitute runner beans, long beans or flat beans and this recipe works well with peas, asparagus and courgettes.

Coconut Dal (spicy lentils)

20 Aug

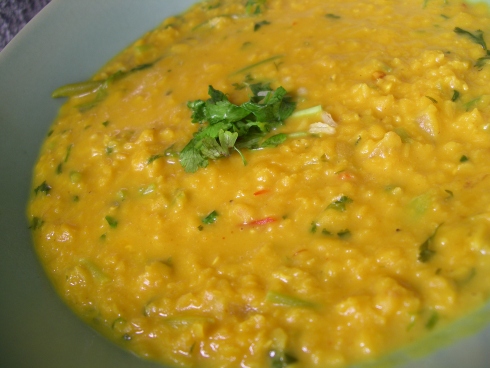
A simple soupy lentil dal flavoured with coconut milk, chilli, garlic and curry leaves. I love all kinds of dal or dhal and this one is a particular favourite with a soft rounded flavour sweet with coconut and warming subtle spices. Serve with rice or Indian breads such as chapati, some pickles and a dry meat or vegetable curry.

  • 1 cup split hulled orange lentils
  • 1/2 tsp turmeric
  • 1 green chilli
  • 4 cups water

Wash the lentils and cook in a roomy pan with the turmeric chilli and water. When the lentils are soft, about 30-40 mins, add coconut milk and season to taste.

final fry

  • 1 tbsp veg oil
  • Half an onion
  • 1/2 tsp coarse salt
  • 3 small hot dred red chillis or sliced large ones
  • 2-3 cloves garlic thinly sliced
  • 12 curry leaves

In a small frying pan heat some vegetable oil or ghee and throw in the onion when it begins to colour add the garlic and when it starts to colour finally throw in the dry chillis and curry leaves fry for a minute then pour the hot oil and spices into the lentils, stir quickly, cover and let the flavours infuse before serving. Stir in a handful of fresh coriander leaf and serve scattered with a little extra fresh coriander leaf or shavings of fresh coconut.

Fried Rice (Indonesian)

14 Aug

In Indonesia this dish would be called Nasi Goreng. It is one of the most popular family or street foods, almost a national dish, often eaten for breakfast, made from left-overs from the night before and found on most Indonesian or malay restaurant menues in the west. The Chinese brought their fried rice dishes to Indonesia, where they adapted to local tastes; the Indonesians cook this dish in woks but it tends to be spicier and flavoured by their sweet sticky Kecap Manis. This is a great dish, adaptable to whatever you have available, and can be made with meat, shellfish, poultry, offal or kept clean and simple with no animal products at all. The only essential ingredient is cold cooked rice making it a useful way to use left-overs and an easy to prepare breakfast or delicious packed lunch.

  • Cold cooked long grain rice
  • green or spring onions
  • garlic
  • Seasoning Ketjap Manis (a sweet soy sauce and speciality of Indonesia)
  • vegetable use whatever is in season, green beans, long beans, runner beans, asparagus, chinese greens, peppers, carrots, fennel, corn, peas, mushrooms
  • protein you can use fried tofu, peanuts, chicken, prawn, pork or sausage.
  • Additional flavouring use dried prawns whole or powdered or prawn paste.

Toppings Serve with fresh vegetables such as; cucumber, cherry tomatoes, peppers or green onions and comdiments such as crispy fried onions and sambal olek (chilli paste), you can also serve topped with shredded egg omelet or hard boiled eggs.

Variations

Cooks Note If you don’t have Katjap Mannis you can make a similar product by mixing soy sauce with sugar, and a little miso paste, garlic and chinese 5 spice) or just use soy sauce and a little sugar.

Crunchy Breakfast Cereal

22 May

My friend Diana gave me a jar of carob molasses to see if i could find a use for it. I love trying out new ingredients and seeing what can be made with them and the runny carob molasses made a most delicious crunchy breakfast cereal or granola. This is a super healthy start to the day; packed with vitamin and mineral rich seeds, nuts and dried fruit as well as slow burn carbs so keeps you going right through till lunch.

  • 500g organic jumbo rolled oats
  • 1.5 – 2 cups of seeds such as sunflower seed, pumpkin seed, linseed and sesame seed
  • 1 cup of nuts almonds, brazil or hazelnuts
  • 4 tbsp runny carob molasses or honey
  • 1 cup dried fruit such as apricots, figs and dates
Mix the oats, seeds and nuts in a large bowl. Drizzle in the molasses or honey and mix well until all the dry ingredients have been coated in the sweet stuff. Spread out on a baking tray (2 trays for this quantity) and bake in a low oven 150c for 20-30 minutes. Take it out at the half way point and give a good stir to make sure the cereal is cooking evenly. Towards the end of cooking keep an eye on it as you don’t want the oats or nuts to burn, which will give it a horrible taste. While it is cooking chop the dried fruit into bite sized bits. Remove from the oven, give it another good stir and leave to cool for a few minutes then stir in the chopped fruit. As the cereal cools the toasted oats and nuts will crisp up. When completely cool and crisp decant into an airtight tin or jar. The granola keeps well for several months.
Variations for an exotic version add dried pineapple, cashews and ribbons of coconut. The next batch I make I will try using rolled barley flakes.

Note 1 cup = 8 tbsp. This quantity makes about 30 portions. Cooking times may vary according to your oven.

Cauliflower with Lentils

1 May

This is a delicious way of cooking cauliflower in a sauce of spiced lentils known as dal or dhal in Southern Asia. The combination is subtle, savory and wonderful. You can add nuts for protein to make this a complete meal or serve as a side for a meat dish or with any number of vegetable dishes for a vegetarian feast.

Make a batch of basic dhal

  • 1 cup red hulled split lentils
  • 1 litre water
  • 1 tsp turmeric
  • 2 large green chillis
  • 1/4 tsp fenugreek seed (optional)

Wash the lentils then put into a roomy pan with the rest of the ingredients. Cook for 30minutes or until the lentils are soft.

  • Half a cauliflower
  • 1 tbsp vegetable oil or ghee
  • 1tsp brown mustard seeds
  • 10 curry leaves
  • 1/2 tsp fennel, nigella or cumin seed
  • 1 black cardamom pod (optional)
  • 1-2 dried red chillis
  • 3 cloves garlic sliced (optional)
  • pinch asefetida (devil’s dung)
  • a small piece of ginger grated (optional)
  • 1 thinly sliced fresh green chilli (optional)

Cut the cauliflower into bite size florets. Remove the green chilli from the dal and add the cauliflower, cover and simmer slowly, meanwhile…

In a small pan or skillet heat the oil then throw in the first 5 spices, when they pop add the garlic and as soon as it starts to brown add the asefetida and pour straight into the lentils and cauliflower, stir and continue to cook until the cauliflower is just tender but still has a fresh tasting bite. Stir in a little more fresh green chilli and ginger, if using, and some fresh coriander leaf if you have any then serve.

Serve with rice or chapatis or a lamb biryani , a grilled meat dish such as masala roast chicken, or a hot meaty curry like Beef Roganjosh or with Bombay potatoes or any number of vegetable dishes such as green bean Coconut Fry  for a vegetarian feast.

Cooks Note Add spices according to your taste, you could add nigella, fennel or cumin seed or indeed all three, use green cardamom instead of black for a more floral taste and use asefetida instead of ginger for a more earthy savory taste and vary the spicing and quantity of chilli depending on what the dish will be served with.

How to Preserve by Heat Processing

15 Mar
Heat processing is a form of preserving foods by putting hot, warm or cold foods into a container and heating until any bacteria that might be within the food or container is killed and a vacum is achieved. It is a very useful technique for the kitchen gardener, no glut of produce need ever go to waste and can be stored for times when there are less fruit and vegetables available fresh from the garden or market.
HEAT PROCESSING
The simplest way to achieve this on a domestic scale is to use glass jars, with lids and heat the jars and their contents in boiling water, the ‘hot bath method’.
Preparing the food
Food can be processed from cold or hot. I only use the hot method, cooking the fruit of vegetables before bottling, as this is the most reliable way to ensure food does not spoil and can be stored safely.
Jars 
You need to use jars that can be heat processed such as; ‘mason’ jars which come with a two piece lid, a domed cap that fits tightly on the neck of the jar and a screwband which fits over the cap and is screwed down onto the jar, kilner type jars which have a clamp down glass lid sealed with a rubber ring, or simple glass jars with special lids. I buy 250g jars from our local agricultural store that sell different types of lids including those for heat processing. The jars can be re-used as many times as they remain sound. Jars must be scrupulously clean and without any flaws, cracks or chips as any flaw could result in the galss shattering while being heated.
Lids
The lids are the important bit, when heat processing the lids need to allow for the expansion of air and liquids and then the function to tighten or lock to seal and make a vacum.  The basic lids are those with a circular dimple which become depressed during the process indicating that a vacuum has been achieved. There are also 2 part lids and clamp lids. It is essential to purchase new lids or seals for each use.
Filling Jars
Pour the hot food e.g. tomato sauce, passata, salsa, cherry compot whatever it is into the prepared jars, leaving a 1cm gap at the top, screw the lids on well but not too tight.

Equipment
There are special heat processing pans available but I find using a pasta pan with a draining insert works just as well particularly if  I am only processing small batches. The pan I have was not expensive, I bought it in Ikea at least 10 years ago, and it will fit 5 x 250g jars comfortably.
Heating
Carefully place the jars in a single layer around the sieve part of the pan then lower into the outer pan. Fill with hot water to 2 inches bellow the lids, and bring to the boil. Once boiling cover with a well fitting lid and set a timer for 15-20 minutes. When the timer goes off raise the draining insert and set down with the jars inside. Use a towl to protect your hands from the heat, tighten all the jars. If used kilner type jars adjust to final lock down position. Set aside to cool. The airlocks in the lids should all depress as they cool which indicates a full seal. If any do not depress repeat the process.
Store
Label and store the jars in a cool dark place. They will keep for several years
Warning
If dimples in the lids rise again this is a sign that air has entered the jar and the food may have spoiled. Do not consume as there could be a risk of botulism.
Note Make sure you follow the instructions that come with the type of jars you have purchased, as each jar type will have its own sealing mechanism.

Chickpea Pancake (Farinata)

14 Sep
This is an Italian street food I first tried in Liguria, close to the southern coast of France. A kind of savoury pancake made from ground chickpeas made into a batter with water and seasoned with olive oil, black pepper, salt and sometimes with rosemary. It is a brilliant snack food and perfect for those who have an allergy to gluten and cannot eat wheat, particularly in pasta-eating regions where avoiding gluten can be a real challenge.
Traditionally Farinata is cooked in a wide flat copper pan with a 4-5 cm lip in a hot wood fired oven. In Nice, just back across the border in France, a similar dish called socca is made with the same ingredients and cooked in an oven or in a skillet over flames. I’ve never tasted the French version but this is what the Ligurian one tastes like. I got the recipe from the back of a packet of chickpea flour i bought in Liguria and have tweaked it to taste more like the local vendors.
  • 250g chickpea flour (about 2 cups)
  • 750g water (about 3 cups)
  • 2-3 tbsp olive oil
  • Sea salt (1 tsp)
  • Cracked black pepper (1/2 tsp)
  • Rosemary minced (optional)

Put the ckickpea flour in a large bowl or jug, one with a spout if you can so it will make pouring easier, add the water beating as you go. Beat the mixture until you have a lovely smooth batter then add the salt & pepper and oil. Set aside for an hour or more to allow the batter to mature it can be left overnight. Heat the oven to very high and put a metal baking tray or a large paella pan into the oven to heat. If you have one, a paella pan is the nearest thing to the sort of pan used in Liguria.

When the pan is really hot lift out and drizzle with olive oil, to coat all over, then pour in enough batter to cover the surface of the pan in a thin layer, tipping side to side to ensure an even cover. Sprinkle with a little more salt and pop it straight back into the oven. Cook for 10-20 minutes, depending on how hot you can get your oven, until the edges and bottom are brown and crisp and the top is starting to take some colour. remove from the oven and tear or cut into pieces.

Sprinkle with a touch more of salt and pepper then serve with a glass of chilled wine or beer and you have a lovely start to the evening. If you have friends round you might want to put the next batch straight in the oven, this stuff disappears quickly. The quantity here makes enough batter for 4 batches cooked in a paella pan

Variation If you don’t want to use an oven it works fine on a stove top, i find using a heavy cast iron skillet works best. Once it is crisp on the bottom, turn it over and cook to just colouring on the other.

Tips for best and most authentic results make sure that the oven is as hot as it will go, the pan you use is very hot and use plenty of olive oil and salt. My oven will only go to 240c but with fan assisted gets pretty hot, hot enough to get the farinata just right. For really crispy ones make the layer of batter as thin as you can.

Spiced Veg Salad (Cachumber)

12 Sep

This spiced salad of raw vegetables is known as Cachumber, Kachumber or Kachmbar in Southern India and Koshumbir or Koshimbir in Western India. These small side dishes of seasoned raw vegetables can be as simple as chopped onion seasoned with lemon and salt or a complex mixture of many vegetables and fried spices. This one is on the more complex end of the spectrum and is really delicious, it adds a lovely crunch to any meal. Choose your own variety of vegetables, whatever is in season, and feel free to experiment with other spices.

  • Onion
  • Tomato
  • Peppers (sweet or hot)
  • Carrot
  • Cucumber
  • salt
  • lemon juice
  • Herbs; Coriander leaf (optional), garlic chives (optional)

Seasoning for 2-3 cups of vegetables

  • 1-2 tbsp descicated coconut
  • 1/2-1 tsp mustard seeds
  • 1/2-1 tsp whole cumin seeds
Finely chop the vegetables, for this recipe i usually do about 2-3 heaped tablespoons of each vegetable, aiming for about 2-3 cups of vegetables altogether.
Heat 1 tbsp of oil and when hot add the mustard and cumin seed then add the coconut. Stir and lift off the heat as soon as the mustard seeds crackle and the aroma from the coconut rises. Stir the fried spices into the freshly chopped vegetables add the juice of half a lemon or more and salt to taste. Leave for 1 hour before serving so that the flavours and juices of the vegetables mingle. Serve with a little extra coconut sprinkled on top.
Variation freshly grated coconut would be great but as i cannot grow it here i keep some bought unsweetened descicated in the pantry.
For other Koshumbir type recipes have a look at: